Building an Active Directory Pentesting Home Lab in VirtualBox
Active Directory is often one of the largest attack services in Enterprise settings. In fact, the OSCP Exam was recently updated to have less emphasis on buffer overflows but added a section dedicated to Active Directory.
AD can be confusing at first to learn, but one of the best ways to learn anything in software, is by installing and setting it up ourselves.
Downloading Windows Server 2019
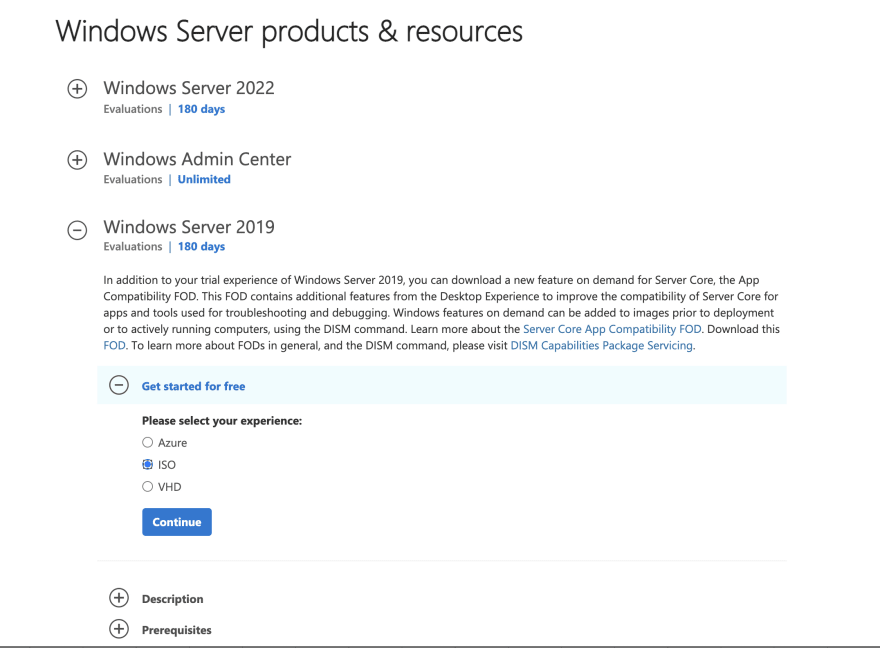
Find the Windows Server 2019 download from the Microsoft Evaluation Center. Scroll down to the option "Windows Server 2019", and select the ISO download option, which Microsoft is apparently labeling as "Please select your experience:"
Before the download will start, you'll be prompted to fill out some personal information. It asks for a work email, but a personal email (ie gmail, etc) should work fine too. Finally select your language, then start the download.
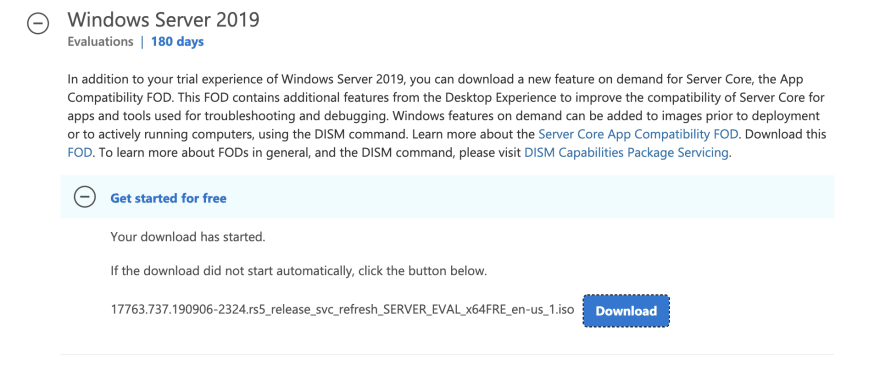
After clicking download, you should see the file pop up in your downloads bar, and the webpage will update to reflect the file name of the Windows Server 2019 Eval version you're downloading.
Installing Windows Server 2019 in VirtualBox
In VirtualBox, start by clicking the New VM button, the blue spikey looking thing. In the VM Options pop-up, for Name type in "Windows Server 2019", for Machine Folder select a folder on your host computer where you want to store your VM files. Select "Microsoft Windows" for Type, and for Version select "Windows 2019 (64-bit)". Then click "Continue".

In the next options panel, "Memory size", you can leave the default at 2048MB, aka 2GB, which is the minimum required memory amount for Windows Server 2019, or. But if you have the host RAM to spare, bumping up the VM memory to 4096MB or a little more is reccommended.
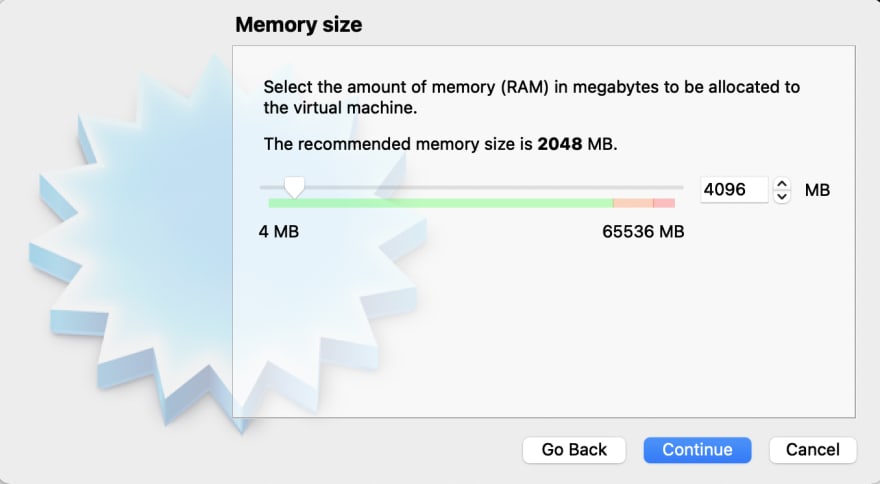
(For our pentesting lab, these small values are fine, obviously though in a production setting you'd need significantly more RAM to run smoothly)
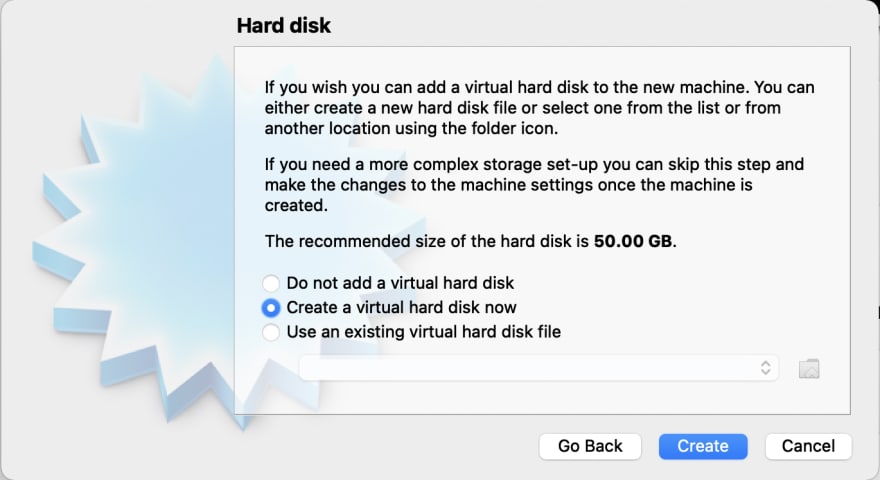
For the "Hard disk" panel, select "Create a virtual hard disk now", then select "VDI (VirtualBox Disk Image)" and hit Continue. For "Storage on physical hard disk" I'm selecting the "Dynamically allocated" option.
The "File location and size" should default to a new folder with your VM name from earlier, in the directory you also specified in the earlier step. I'd reccommend leaving this default so that all the VM files are contained in a single location. I'm leaving my VDI size at 50.00GB.

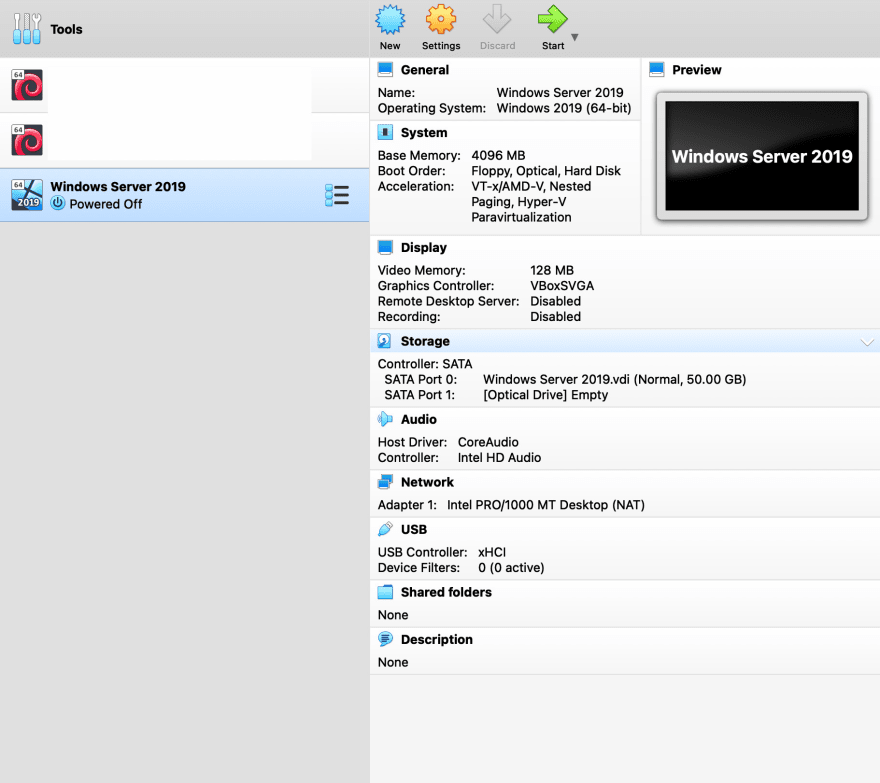
After clicking through that, our new VM should appear in the left-hand sidebar, I have a few other VM's already installed which is why my machine appears further down on the list.
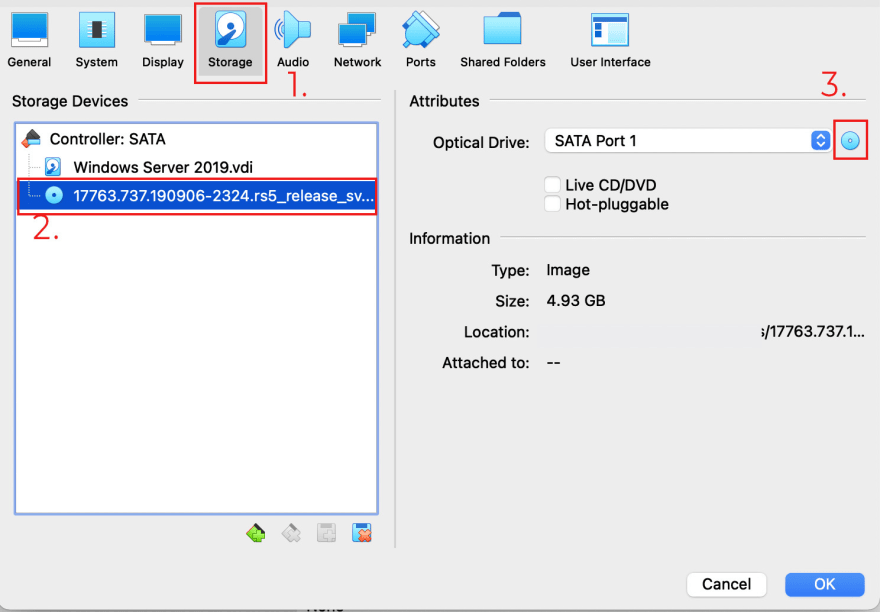
Now that we have a VM created, we still need to install Windows Server 2019 onto our Virtual Machine. With the new VM highlighted (the background color should be a light blue) click the settings button.
In the new pop-up, select "Storage", then under the "Storage Devices" window, click the empty disc icon. On the right-hand windows "Attributes", click the blue disk icon, click "Choose a disk file", then find the Windows Server 2019 .iso file we downloaded earlier. The filename will probably be the same or similar to: 17763.737.190906-2324.rs5_release_svc_refresh_SERVER_EVAL_x64FRE_en-us_1.iso. If the iso is loaded up correctly, you should see the "Empty" next to the disk icon change to the .iso file name. Click "OK" to save changes and close the pop-up.
In VirtualBox, the steps that we just took are equivalent to inserting an install CD (or in this day and age, an install USB). So now we'll need to turn on the VM so we can actually install Windows Server from that .iso.
With the new VM still highlighted, click the green "Start" arrow. A new window should pop-up on your host machine. This is our Server 2019 VM. After it finishes initially booting up, you'll see the Windows Server 2019 installation prompt.
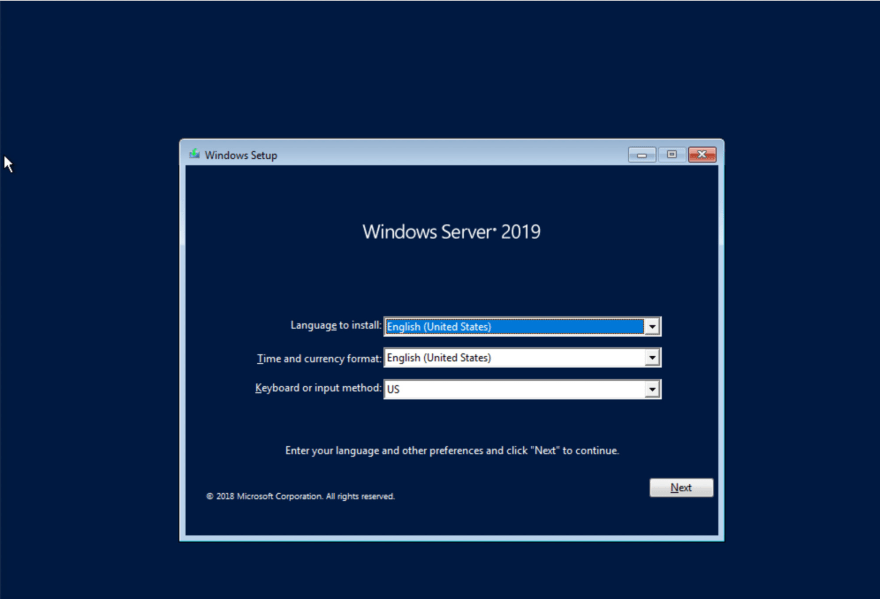
Leave the default settings as-is, and click next. You should see a new tab with a single "Install Now" button. Click that, and on the "Windows Setup" tab that appears, You should see 4 different versions of Server 2019. The option that we want is "Windows Server 2019 Standard Evaluation (Desktop Experience)".
It's important to select the "Desktop Experience" version of Server 2019, this is the version of Windows Server that has a GUI similar to a standard Windows 10 install. In prior versions of Windows Server, you were able to install a GUI after initial installation, but that is no longer the case, so let's make sure we're installing the GUI version from the start.
After selecting the correct version, you'll need to accept Windows License terms. Then select the "custom install" version, since this is a fresh machine and we're not upgrading from any previous versions. Our VirtualBox VDI should appear in the Windows Install tab as "Drive 0 Unallocated Space", it should be selected by default, so click the Next button.
This will start the actual installation of Windows Server 2019 Desktop Experience. Like the download step from earlier, this process will take a little bit of time to run, so let Windows do it's thing through the install process. You'll probably notice that the Virtual Machine restarts a couple times through the install. This is normal.
Initial Login & Setup
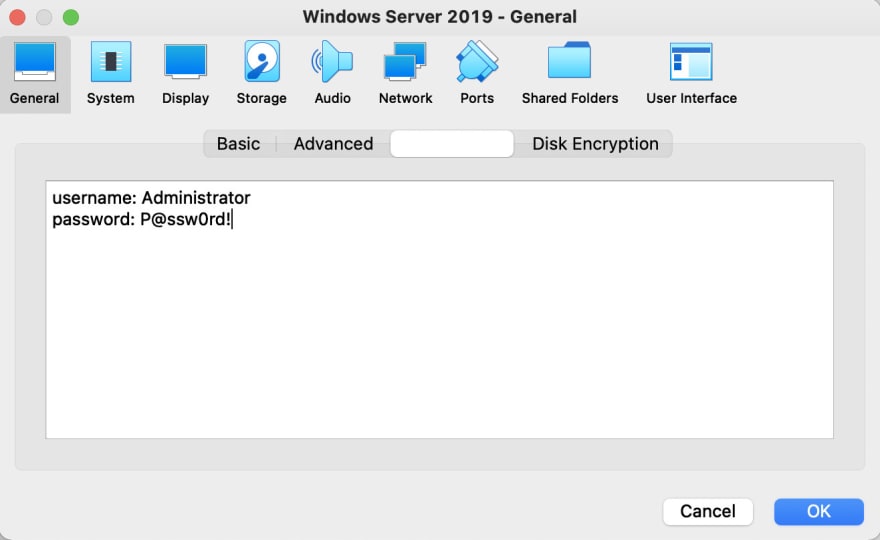
Once the install is finished, you'll need to supply a few more configuration settings to complete setting up your Windows Server VM. The built-in administrator username is pre-selected as "Administrator", for a password, I'm using P@ssw0rd!, not very secure, but it'll work for a small-scale home lab.
Additionally, back in the VirtualBox manager, you can save the Administrator password for this machine by clicking "Settings", in the "General" tab, select "Description" then add some notes with our machine credentials.
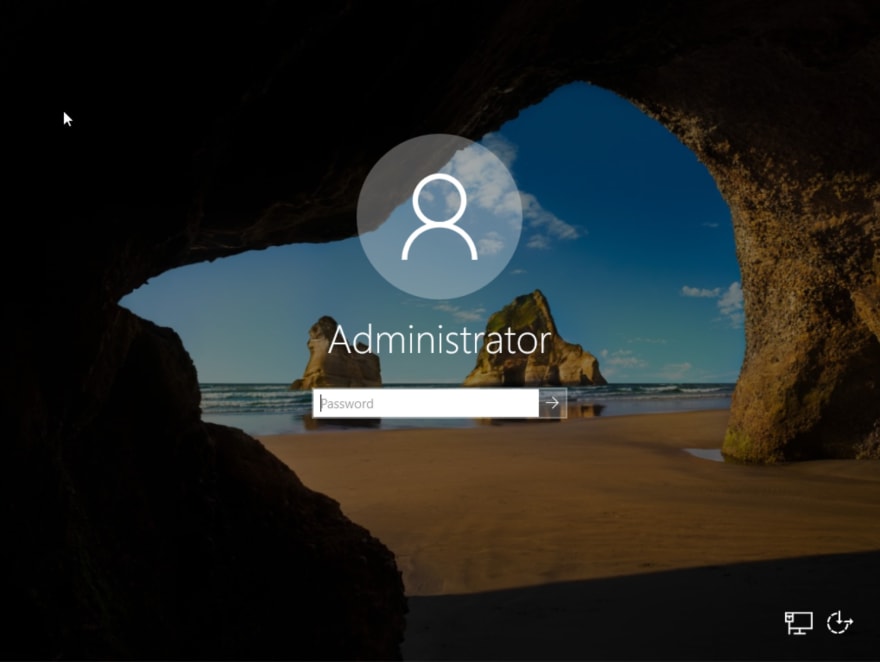
Once you've entered and saved our Administrator password, Windows should finish applying those new settings, and then open up a to a standard lock screen which should look familiar to you if you've used Windows 10 before.
To login to our Windows Server VM, we'll need to hit "Ctrl + Alt + Delete". I work on both macOS and Windows Hosts, and trying to figure out the equivalent keys between various hosts can be a pain. Fortunately, VirtualBox has a nice built-in feature that allows us to input "Ctrl + Alt + Delete".
On a macOS host, make sure you have your Windows Server 2019 VM selected, then in the upper menu bar, select "Input", hover over the "Keyboard" option, then click "Insert Ctrl-Alt-Delete". That dropdown will also show you what the keyboard shortcut on your host is to enter that without having the select the menu bar option.
Once that's entered, you should be able to type in our Administrator password, P@ssw0rd! and login.
On initial login, I got an automatic prompt asking if I wanted to turn on "Network Discovery", I went ahead and turned that on.
Side Note: To the best of my knowledge, enabling "Network Discovery" doesn't affect ICMP settings. Ie, if you were to try to ping your Server 2019 VM from another host in your VirtualBox network right now, it wouldn't work. That's skipping ahead a couple steps though, so don't worry too much about it right now if that doesn't make sense to you.
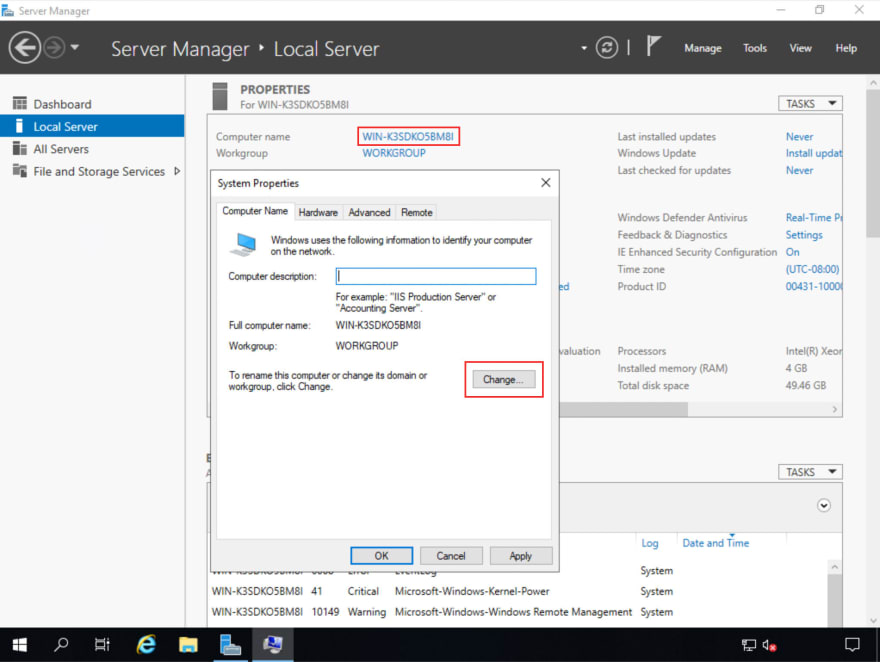
You'll also most likely see that the "Server Manager" program starts up by default. The astute readers among you might have noticed a tiny bright Orange "1" followed by a large heading labeled "Configure this local server". I think that means Windows wants us to click on it.
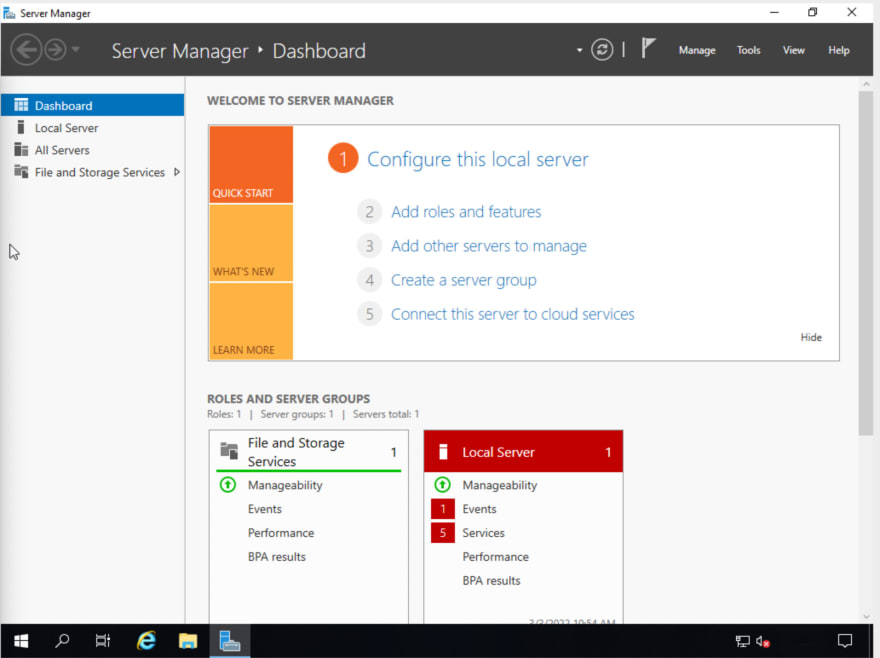
Clicking on that link takes us to the "Local Server" configuration page, which can also be access via the left-hand sidebar.
There's two main settings to take note of at the moment, the first is our Computer Name: "WIN-K3SDKO5BM8I", the second is the name of our Workgroup: "WORKGROUP".
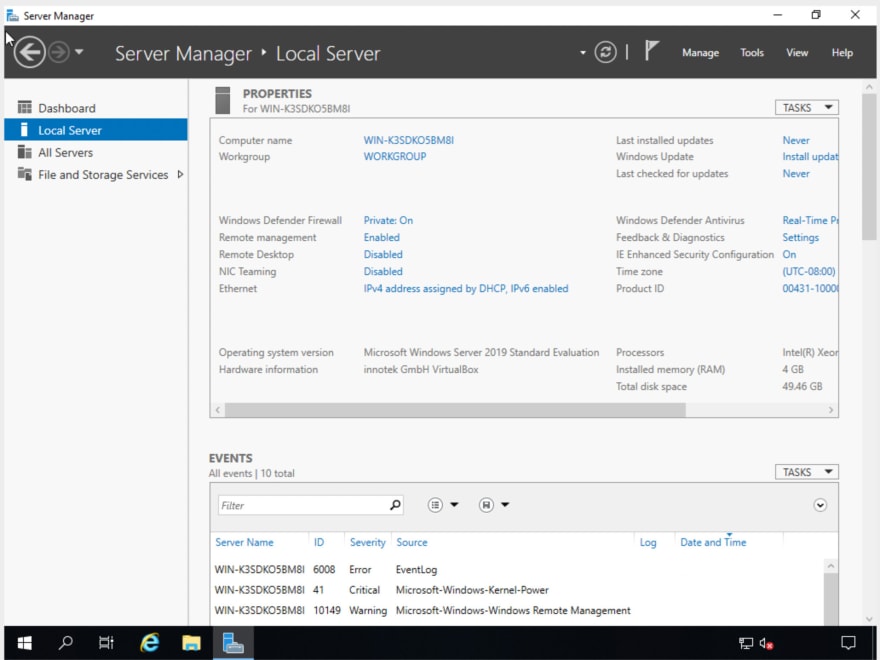
I won't go into too much detail about the differences between a Workgroup and a Domain but one of the key differences for our use case is that in a Workgroup, user accounts are managed by individual computers, whereas in a domain user accounts are managed by a central server or servers, called domain controllers.
You might also hear it explained that in a Workgroup, all the various computers in that Workgroup are essentially peers, and no one single computer has elevated or admin credentials above the others in that Workgroup. Domains, conversely, have that central domain controller as the top-level administrative component, and as such have admin rights over the various user accounts within the Domain.
Active Directory Domains is what you're more likely to see in larger scale, or Enterprise environments, and that's what we're trying to set up (albeit on a smaller scale) for our local pen-testing environment.
With that explanation out of the way, let's go ahead and get started on our AD setup.
Installing Active Directory
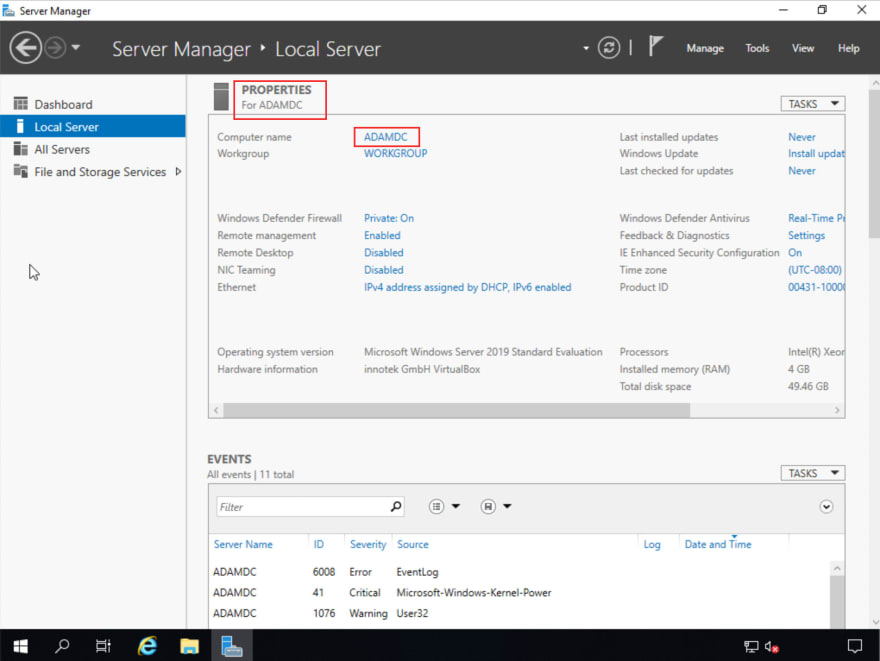
To start, let's rename our Windows Server 2019 Computer Name to something reflective of the fact that this will become our Domain Controller. Click the light-blue computer name, then in the "System Properties" pop-up, select the "Change..." button down next to the "To rename this computer...." text.
I'm renaming my computer the very creative name, ADAMDC. Adam, for my name, and DC to reference the fact that this is our domain controller.
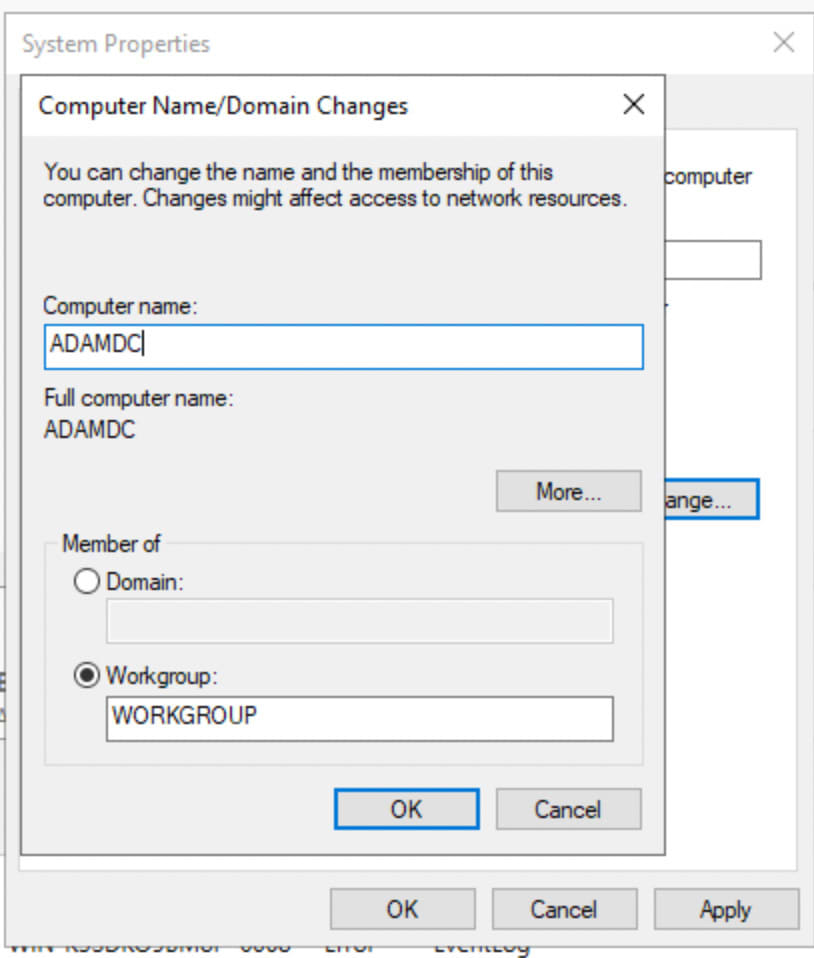
Hit "OK" and after a few seconds that should update. You'll also see a pop-up stating that you'll have to restart in order for our name change to take effect. Hit "apply" in the "System Properties" window to save the changes. But choose the "restart later" option, to delay the automatic restart.
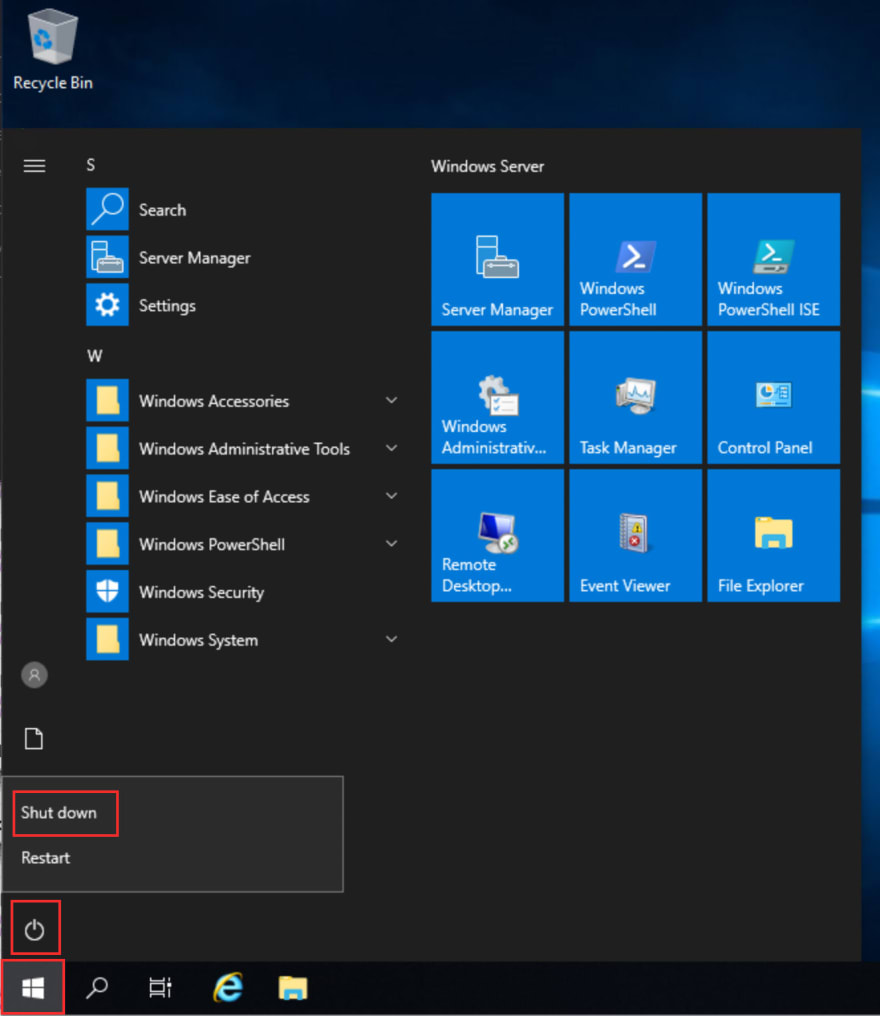
We still need to setup some VirtualBox networking options, something we can't do while our VM is running, so this is a good opportunity to shutdown our VM.
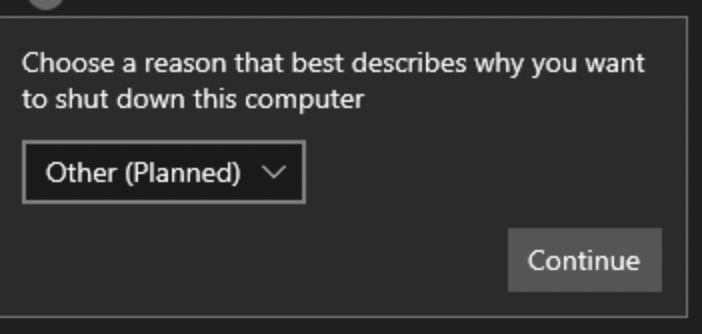
Click the "Windows" button in the bottom left-hand screen, then the power button icon and select "Shut down". This should be very familiar if you're used to working with Windows 10. What might not be familiar is the next pop-up, selecting a reason for shutting down.
In our case, we'll just select "Other (Planned)" as the reason every time we shutdown our Windows Server VM. This isn't a production server, so it's not really important or even necessary to log reasons for shutdown.
If you do shutdown without go through that process (ie you just close your virtual machine window) you'll get a mildly annoying pop-up the next time you turn on the vm. It's kinda like Microsoft's version of Mr. Resetti.
Once that completes shutting down, click back into your "VirtualBox Manager".
Installing Active Directory - VBox Network Configuration
We haven't look too much into our actual VirtualBox setup so far, other than what was absolutely needed to get our Windows Installation up and running. Now though, we're going to want to make sure we have our networking options setup and configured correctly before we move onto to actually installing Active Directory.
VirtualBox has a couple different types of virtual networking options, but the one we're going to focus on is a "Host-Only" adapter. TODO MORE INFO
First, ensure that you have a network setup in VirtualBox.
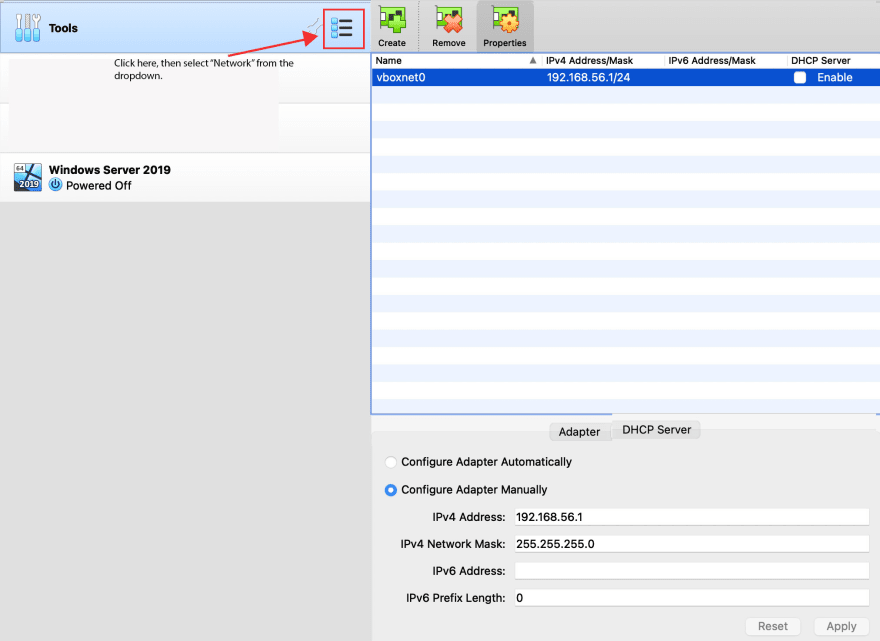
Click "Tools" and then the hamburger menu looking thing to the right of it. You should see 4 options pop-up, "Welcome", "Media", "Network", "Cloud". Network is the option we want so click on that.
If you don't already have a network click the "Create" button to make a new one, otherwise click properties to edit your existing one. Make sure the "DHCP Server" option is disable, and also select "Configure Adapter Manually"
Give your adapter the settings of:
IPv4 Address: 192.168.56.1
IPv4 Network Mask: 255.255.255.0
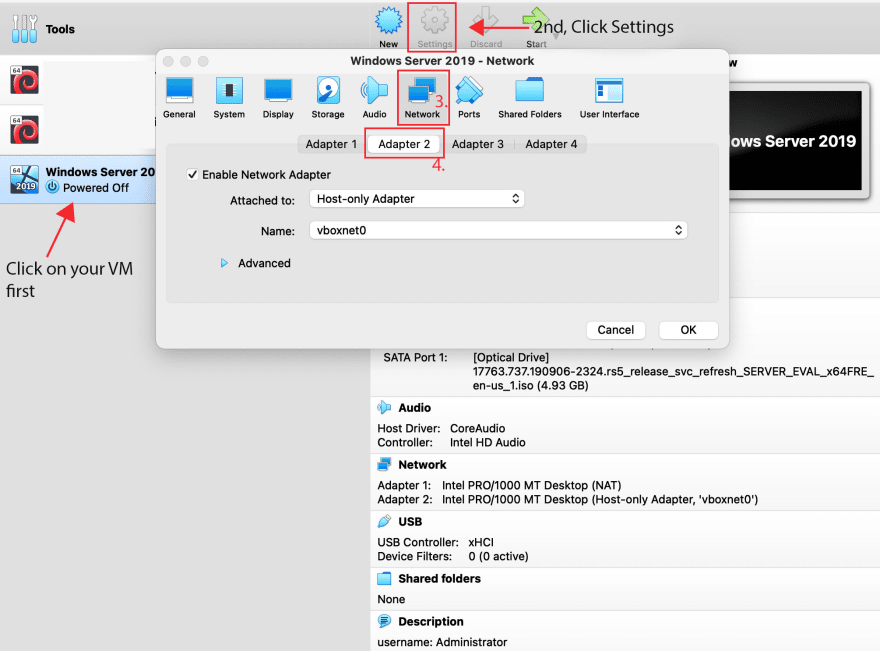
Still in VirtualBox Manager, select your Windows Server VM again, and select the options for that VM.
In the Options pop-up, choose the "Network" tab, I have a NAT adapter in the Adapter 1 slot, so in Adapter 2 I've checked "Enable Network Adapter", set the Attached to: value as "Host-only Adapter", and for Name:, that's the name of the network we just created, I've selected my VBox network.
Save those settings, and it's time to start up our Windows Server VM Again. Click the green start arrow. Then login with our administrator credentials.
When you login, Server Manager should pop-up automatically again. Confirm that our computer rename from earlier successfully completed, then minimize Server Manager, and open up Command Prompt.
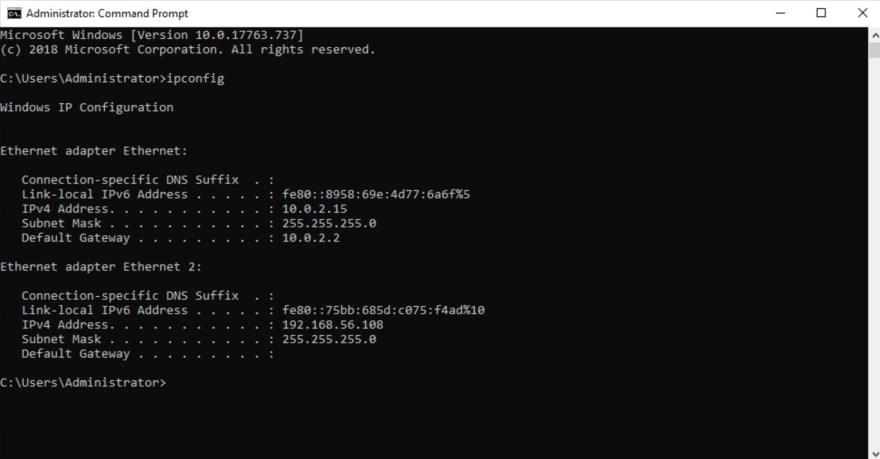
In command prompt, type the following:
ipconfig
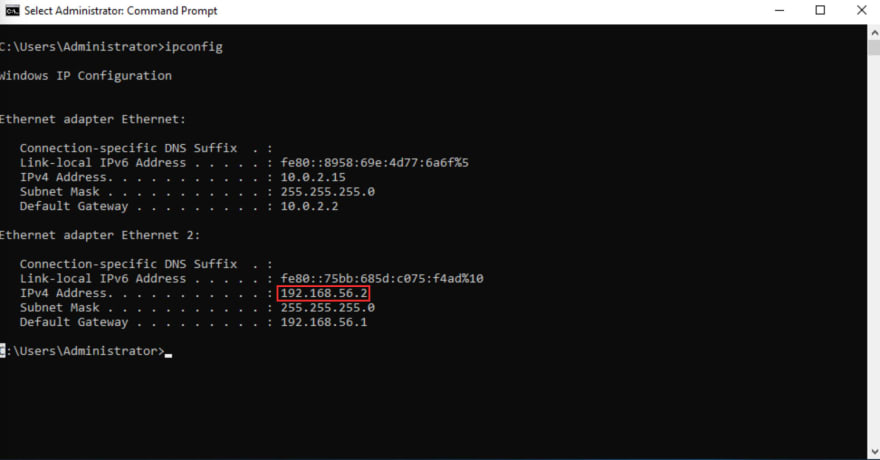
You should see an output with two network adapters listed (Virtualbox treats these as Ethernet connections). The first Network should be your NAT. That's how your VM gets external internet access. The second adapater should be the host only adapter we just setup, so you should notice that the IP will be in the range of the subnet that we specified when setting up the network a few moments ago.
Now we need to manually assign our Windows Server Computer a static IP for our host-only network. Open up Control Panel, then select "Network and Internet", then "Network Sharing Center". You should once again see our two networks listed.
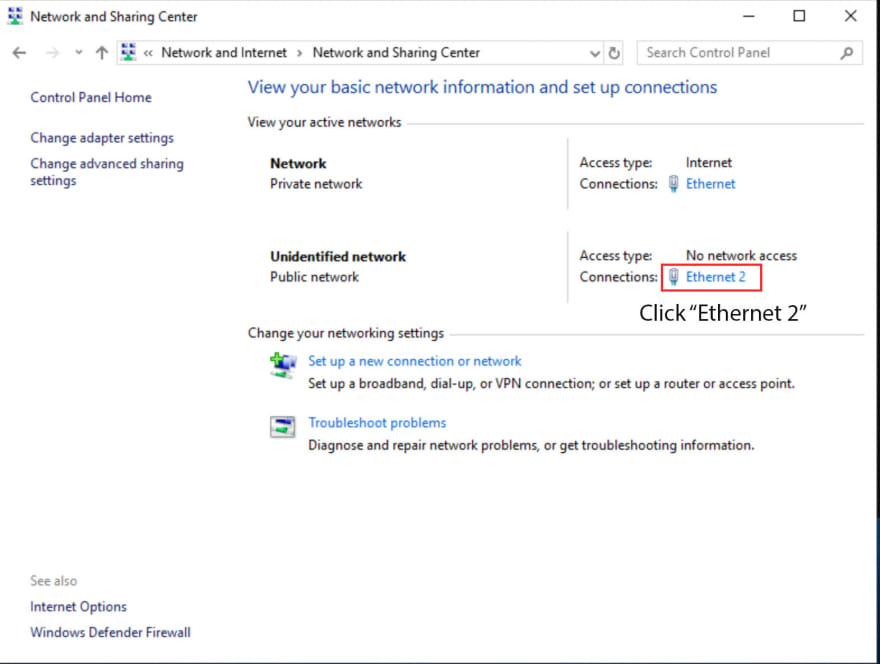
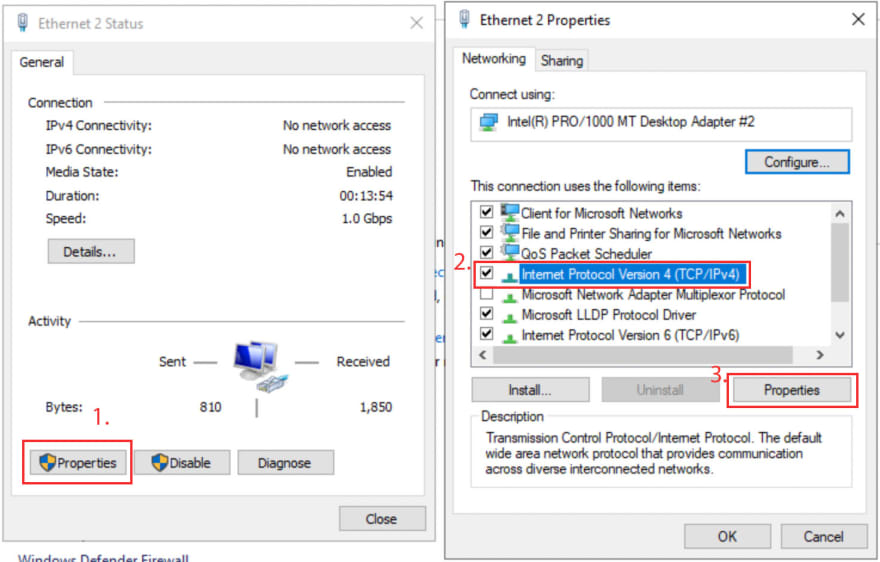
Click the host-only network Ethernet (should most likely be Ethernet2), then select "Properties", then in the properties pop-up select the "Internet Protocol Version 4 (TCP/IPv4)" so that it is highlighted. Then click properties for IPv4.
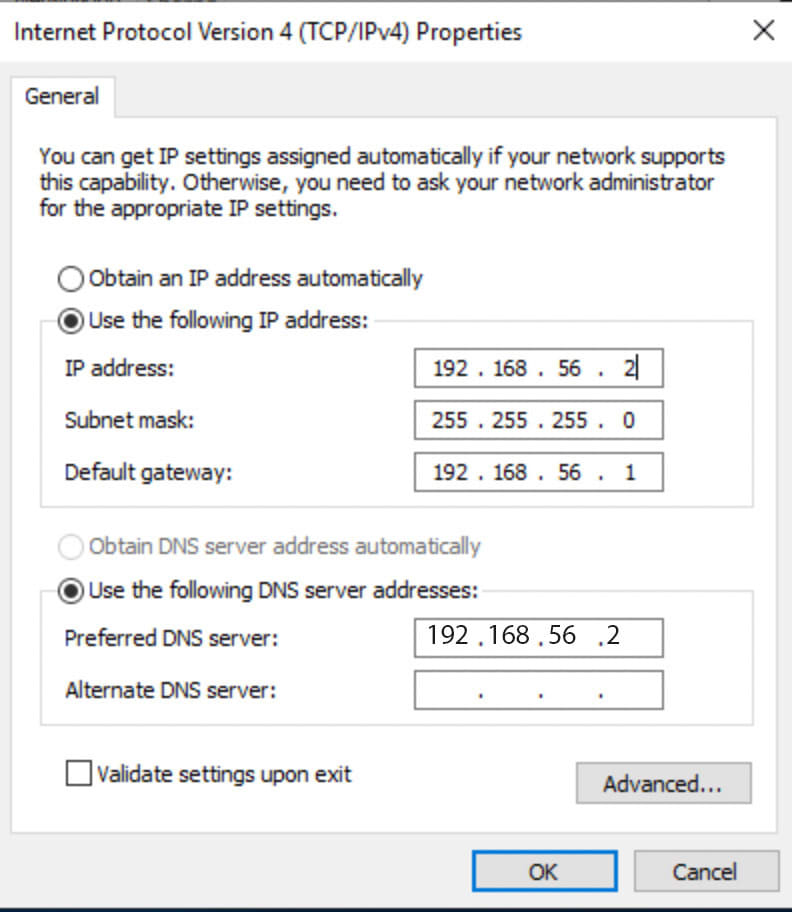
A new window should popup, and "Obtain an IP address automatically" is most likely pre-selected. Choose "Use the following IP address:"
IP Address: 192.168.56.2
Subnet mask: 255.255.255.0
Default gateway: 192.168.56.1
Preferred DNS server: 192.168.56.2
With those settings inputted, click through the various "OK" buttons to apply the changes.
Back in command prompt type cls to clear out previous ipconfig command. Then, re-run ipconfig.
New IP, who dis?
With all that setup out of the way, we now have a local network (the host-only network) that our VirtualMachines can use to talk to each other. We also assigned our server a static IP in that network which is recommended before setting up Active Directory. Finally, we pointed the preferred DNS server to our Windows Server Machine. We'll install a DNS server later to handle DNS for our AD Domain.
Installing Active Directory - Back to Windows Server
So, we now have our domain controller ready (not entirely true but we'll fix that shortly), but we still need a domain for it to be in control of.
Return to the Server Manager Dashboard, and this time, select option 2 from the middle list. It's the "Add Roles and Features" link. The "Add Roles and Features Wizard" should pop up.
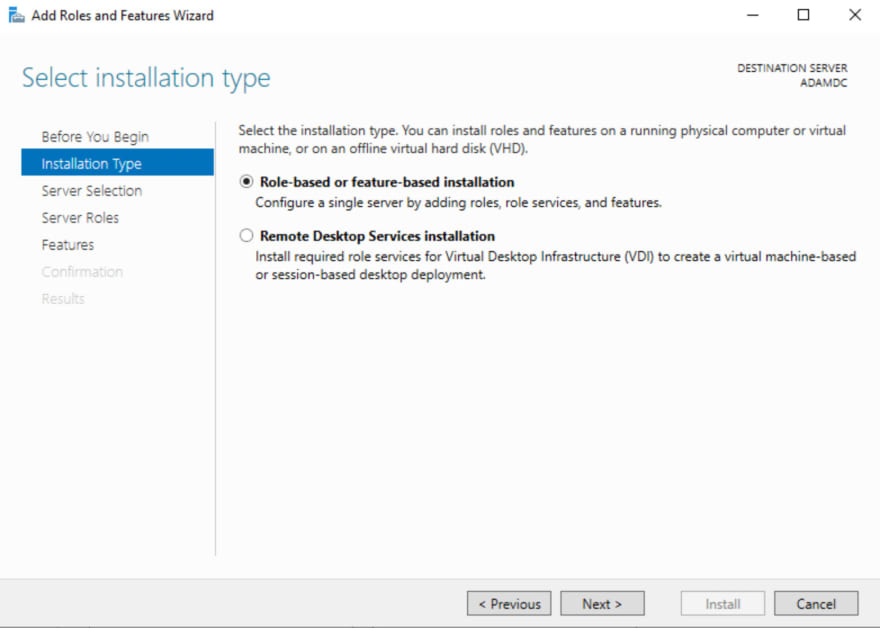
Click "Next >" on the "Before You Begin" page, then on "Installation Type" ensure the first option "Role-based or feature-based installation" is still selected and click "Next >"
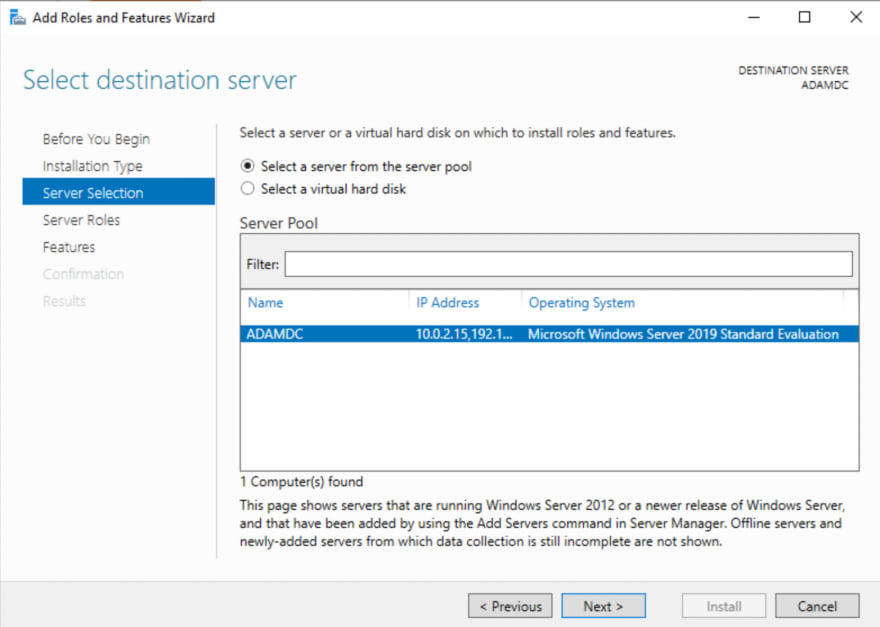
On the "Select destination server" page, you should see our Windows Server 2019 Machine, named ADAMDC, in the Server Pool list, and click next.
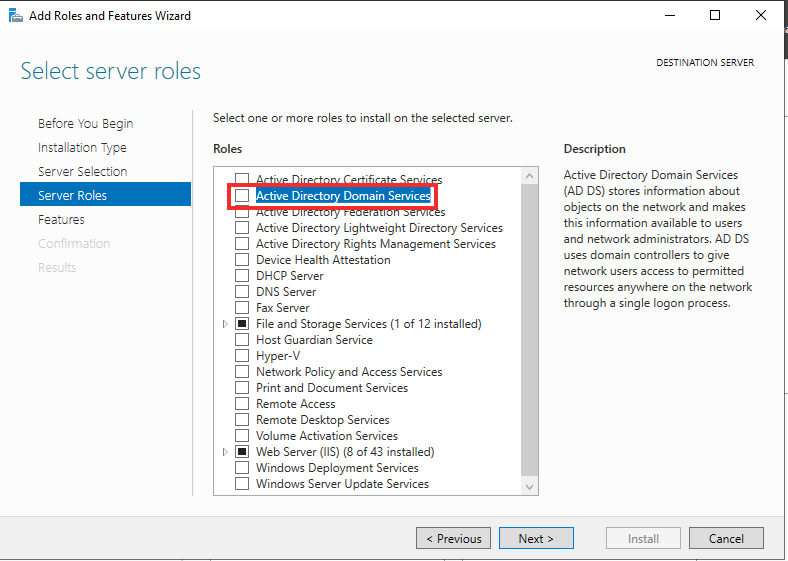
In the "Server Roles" you'll want to check the "Active Directory Domain Services" box. (This is the whole thing we've been working towards).
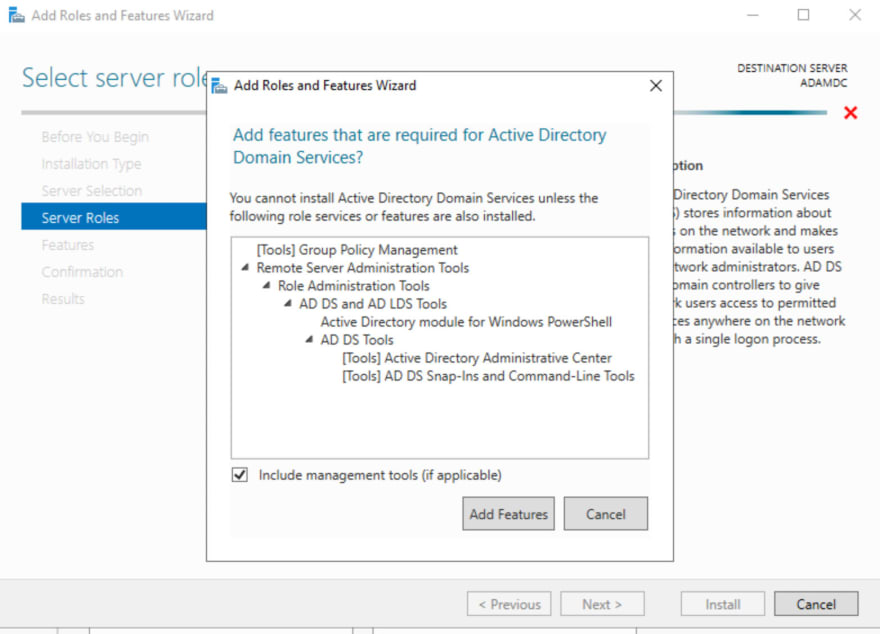
When you click that box, a new pop-up will appear confirming that you want to add the additional required services for AD.
We do. Click "Add Features".
Click "Next" through the "Features" page.
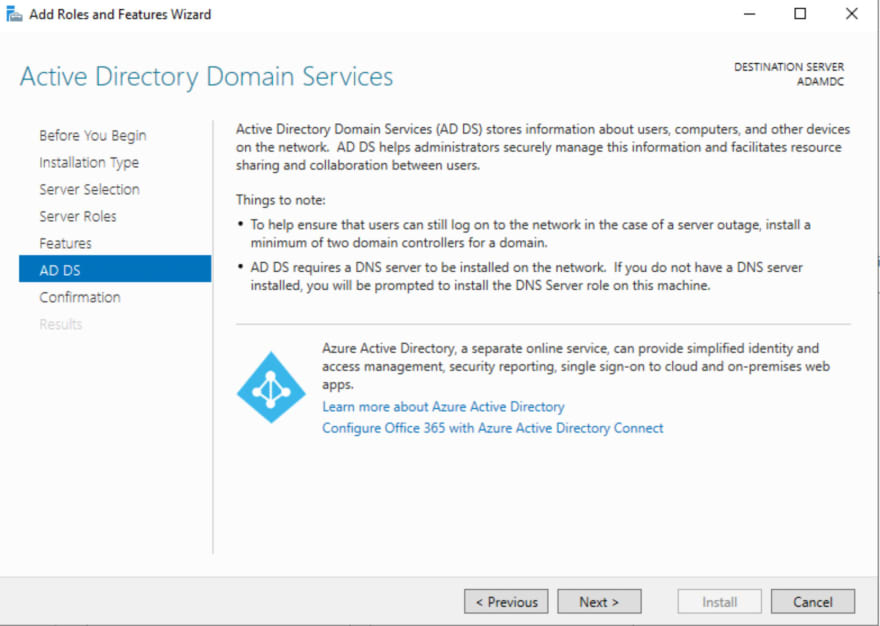
That'll bring you to the Active Directory Domain Services information page. Give it a quick read, then click "Next >"
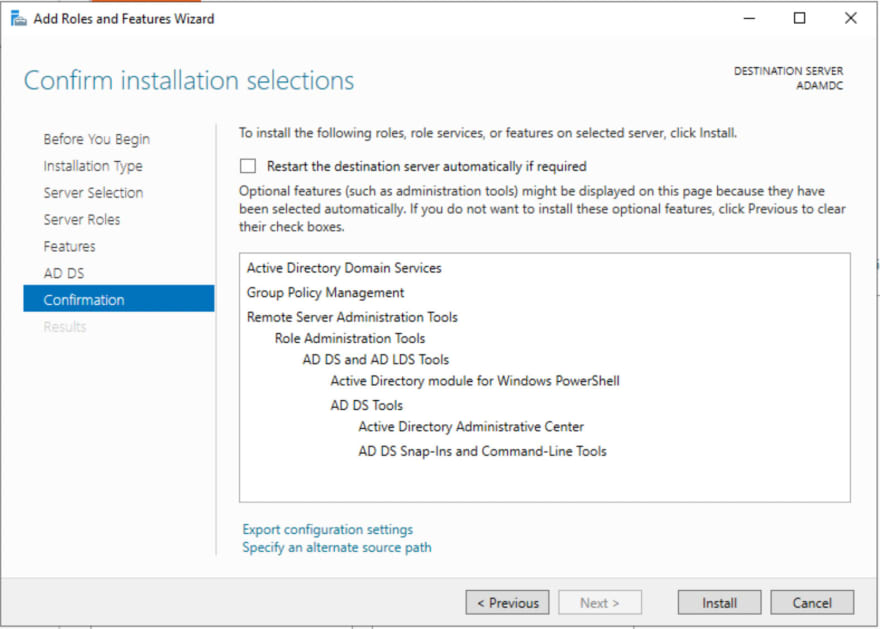
This is it, the confirmation page. As Uncle Ben said, "With great power comes great responsibility." When you're ready, click "Install".
The installation will start and run for a little, you can close out of the installer window if you want, but since we're already in a VM you can also just open up a different window on your host to watch youtube while we wait.
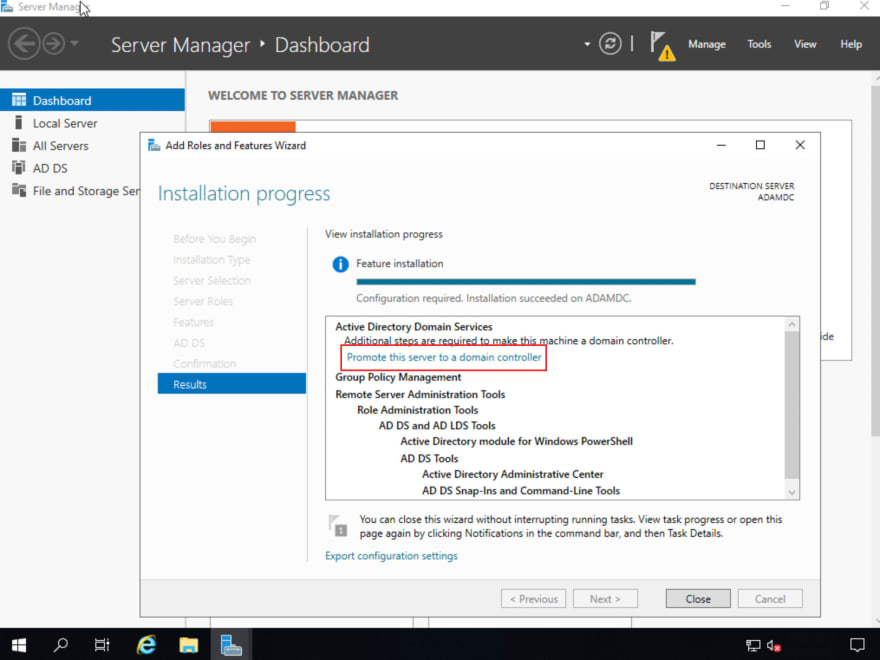
After the installation completes, we still have a little more work to do. Remember earlier when I said we had our "domain controller" ready? Well, I might've lied a little bit, back then it was still just a lowly server. But I think our server has performed admirably so far, and is worthy of a promotion.
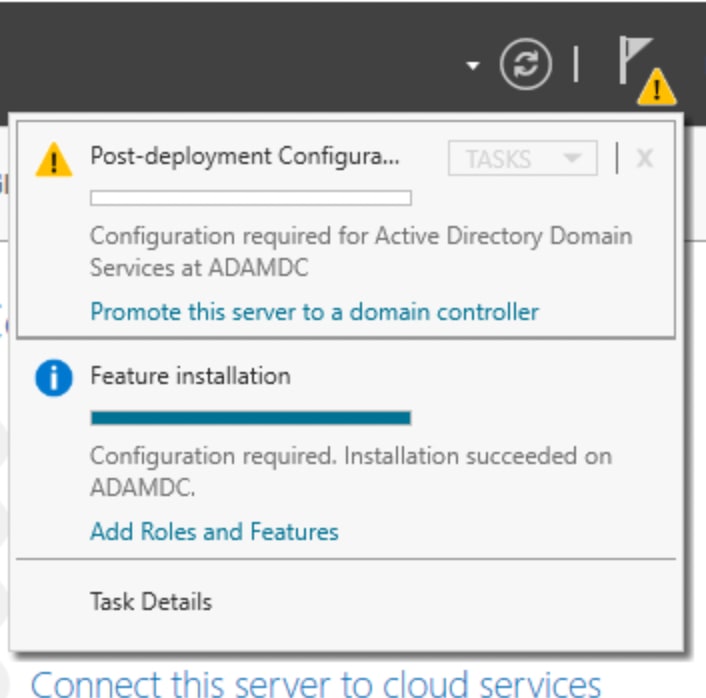
Click the "Promote this server to a domain controller" link. If you closed out of the installation wizard, you can also find this link back in Server Manager.
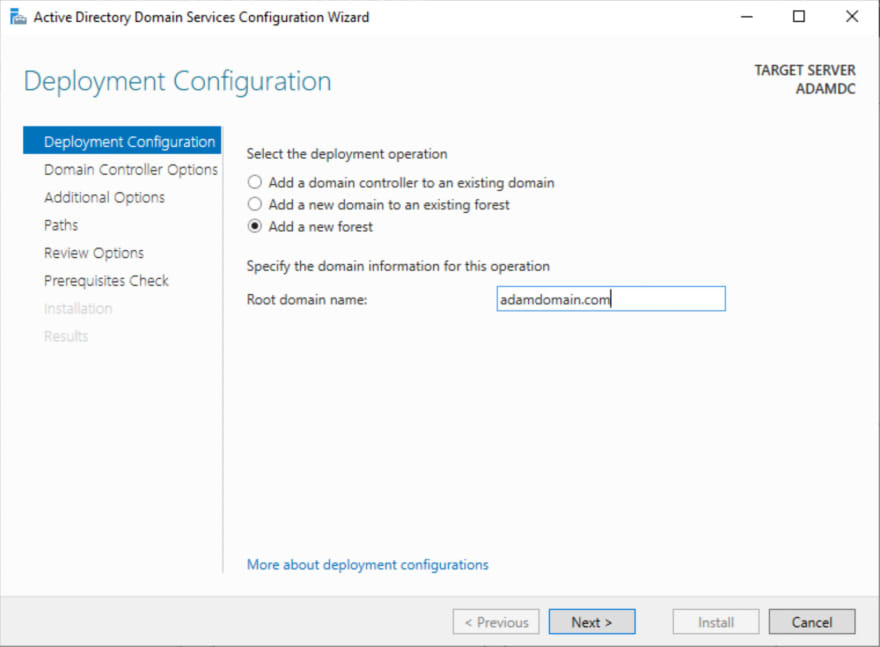
That will pull up the "Active Directory Domain Service Deployment Configuration Wizard" Select "Add a new forest" radio button, and I'm using the Root domain name: adamdomain.com. Which for the record, is a domain I do not own. This isn't something you'd want to do in a real-world install, but since this is just for our home lab I think it'll be fine.
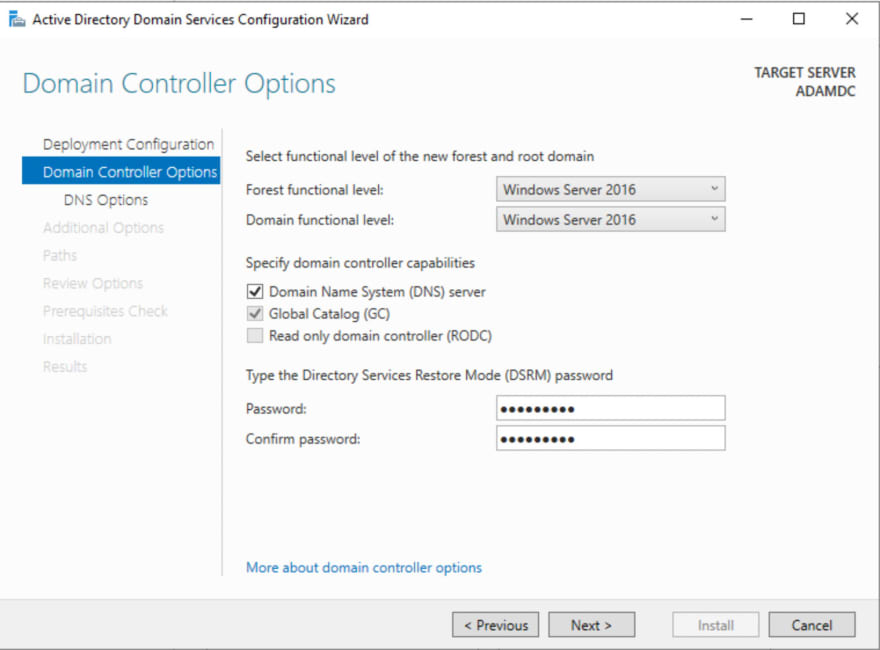
Leave Forest & Domain functional level at "Windows Server 2016", and add a (DSRM) password, I'm going to use P@ssw0rd! again since this isn't a real AD install. Then go to the next page.
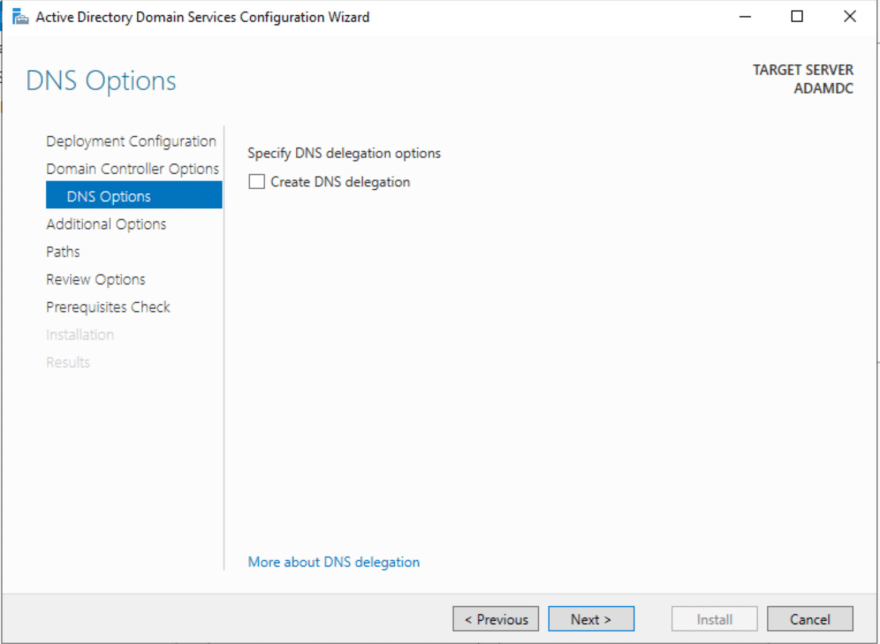
On DNS Options, uncheck "Create DNS delegation" and click "Next".
Wait for the NetBIOS domain name to automatically detect your domain name then click "Next".
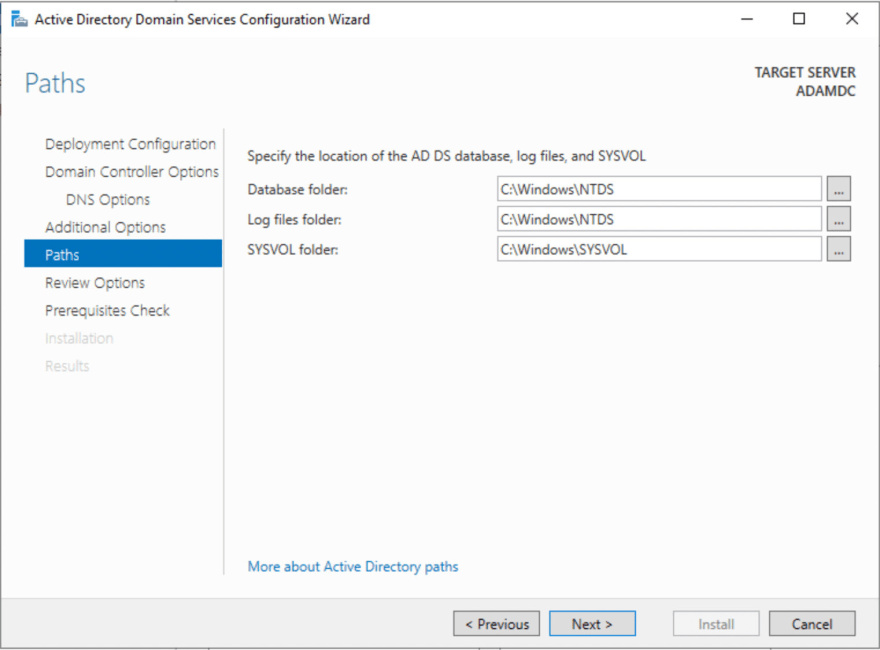
Click "Next" again on the Paths page to accept the defaults.
On the "Review Options" page, there isn't much for us to do, click "Next" and the Configuration Wizard will run a check script to ensure the Active Directory install can complete successfully on your machine.
On mine, I got a warning about weak cryptography algorithms and a warning about our first network adapter (the VirtualBox NAT) not having a static IP.
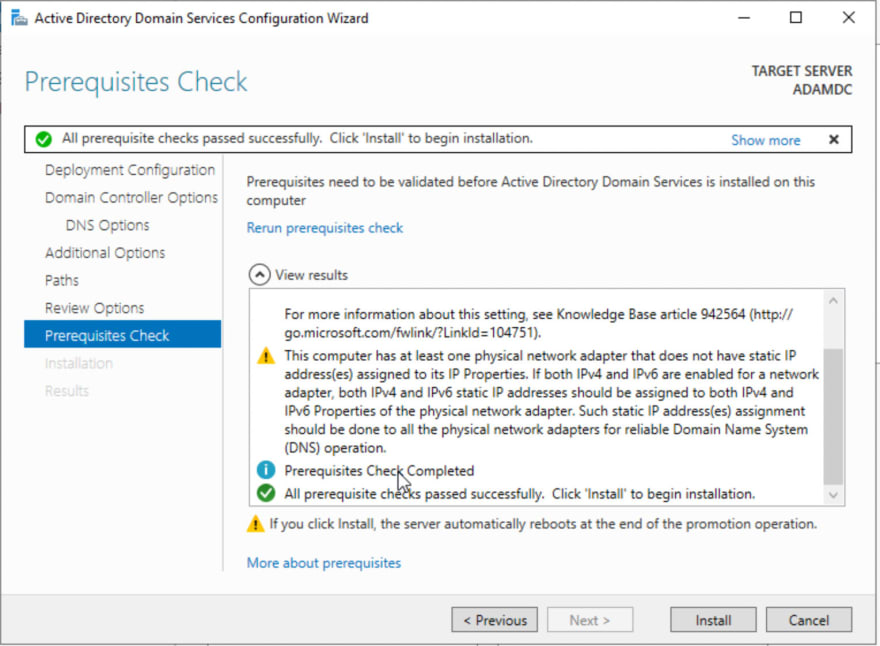
We can ignore those and click "Install". This will initiate the rest of the Active Directory installation process. This process might take a while to complete, and like some of the previous stages, will lock out and reset while it runs.
Once the server finishes install AD and resets, you'll see the lock screen again. Enter "Ctrl + Alt + Delete", but this time, you should notice the login page looks different than before.
This is part of the change from our Server being in a WORKGRUP into a Domain. Log in with our adminstrator credentials, those are still valid. Then when "Server Manager" starts up again, click "Local Server". It will take a couple moments for the information on the Local Server panel to update. but you should see that it now reflects our AD install.
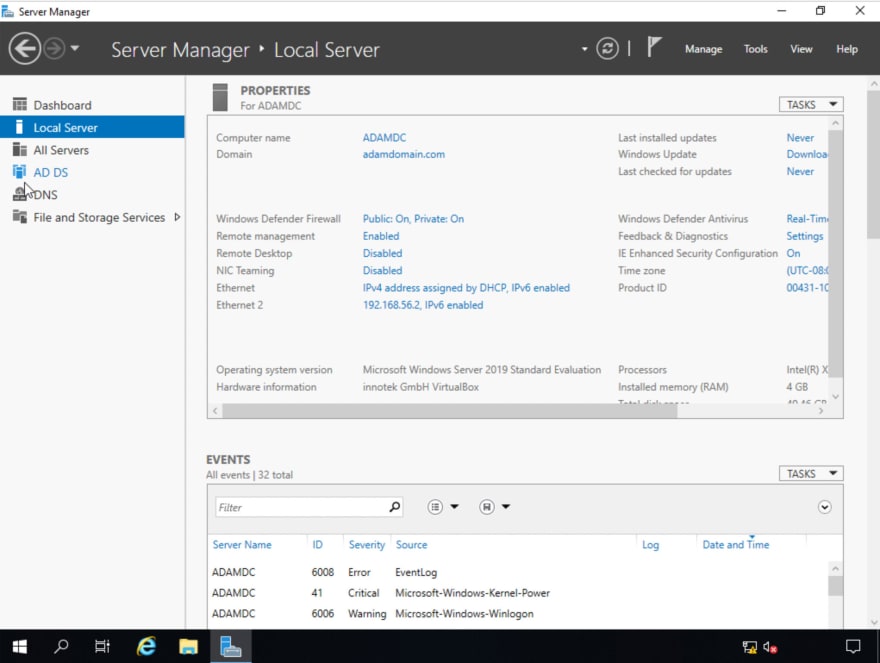
With that done, we now have Active Directory installed, we don't have any other users, or other computers connected to our Domain yet, but we can do those things in another write-up.
One other thing that I noticed and found interesting through the install is that after the install was finished ICMP was enabled when prior to that it was not. If you had tried to ping our Windows Server Prior to the AD installation, you would've gotten "Destination Host Unreachable".
Here's a ping from kali to our Windows Server post-install: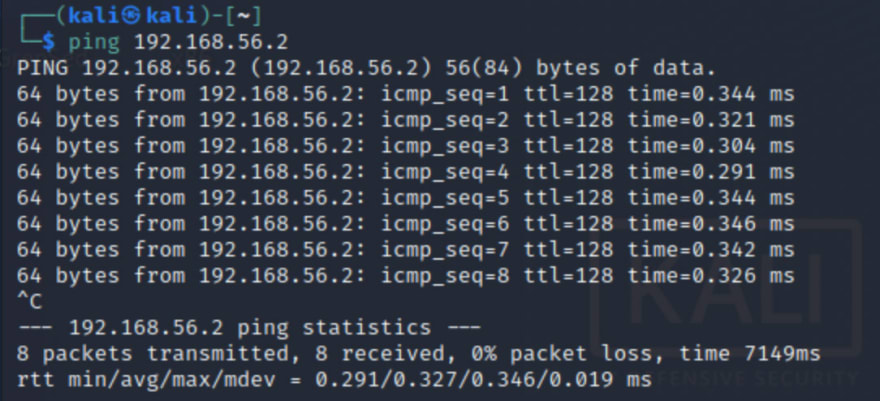
It's easy enough to configure Windows Server to enable ICMP pings, but I always thought it was counter-intuitive (although probably a sensible default for security reasons) that it was blocked by default.
Nmap still seems to have issues running a ping against our windows host though, a default scan returns "Host Seems Down", but adding the -Pn flag does show that our Windows AD Server is up and running, here's the results of a standard nmap -sC -sV -Pn scan from Kali.
┌──(kali㉿kali)-[~]
└─$ nmap -sC -sV 192.168.56.2 -Pn
Starting Nmap 7.92 ( https://nmap.org ) at 2022-03-03 16:39 EST
Nmap scan report for 192.168.56.2
Host is up (0.00074s latency).
Not shown: 989 filtered tcp ports (no-response)
PORT     STATE SERVICE       VERSION
53/tcp   open  domain        Simple DNS Plus
88/tcp   open  kerberos-sec  Microsoft Windows Kerberos (server time: 2022-03-03 21:40:22Z)
135/tcp  open  msrpc         Microsoft Windows RPC
139/tcp  open  netbios-ssn   Microsoft Windows netbios-ssn
389/tcp  open  ldap          Microsoft Windows Active Directory LDAP (Domain: adamdomain.com0., Site: Default-First-Site-Name)
445/tcp  open  microsoft-ds?
464/tcp  open  kpasswd5?
593/tcp  open  ncacn_http    Microsoft Windows RPC over HTTP 1.0
636/tcp  open  tcpwrapped
3268/tcp open  ldap          Microsoft Windows Active Directory LDAP (Domain: adamdomain.com0., Site: Default-First-Site-Name)
3269/tcp open  tcpwrapped
Service Info: Host: ADAMDC; OS: Windows; CPE: cpe:/o:microsoft:windows

Host script results:
|_nbstat: NetBIOS name: ADAMDC, NetBIOS user: <unknown>, NetBIOS MAC: 08:00:27:a9:d5:db (Oracle VirtualBox virtual NIC)
| smb2-security-mode:
|   3.1.1:
|_    Message signing enabled and required
| smb2-time:
|   date: 2022-03-03T21:40:23
|_  start_date: N/A

Service detection performed. Please report any incorrect results at https://nmap.org/submit/ .
Nmap done: 1 IP address (1 host up) scanned in 64.26 seconds
Related Post
.png) Feb 13, 2023
Feb 13, 2023
Top Five Free Ai Content Generator: Free Ai Content Generator 2023
The soul of a website is called the content. So it is easy to understand that the website has no value without content. And writing content takes a lot of research. There is a lot to think about. Whether it is WordPress or Blogspot, everyone knows how hard it is to write content. But what if these contents become automatically generated? Yes, you are right, today I will talk about something like this in this article. Today I will share with you five free AI content generators that are completely free.What Is Ai Generated Content?Before knowing what AI content is, we need to know what AI is. AI is Artificial Intelligence. Many people have more or fewer ideas about artificial intelligence. But for those who don't know. Artificial intelligence is when a machine such as a computer can make decisions by itself, it is called artificial intelligence. Now let me tell you what AI content is. AI content means you just give a few hints and it will automatically write the entire content within seconds. This content is called AI-generated content.Is Ai Generated Content Unique?Yes, Of course. Because these AI-generated contents are generated by different AI content generators completely by themselves. So it will give you completely unique content. AI content generators will write the content based on the topic which are you give.How Does Ai Content Generator Work?The way Ai content generators work is that You first give the generator little hints about the topic you want to write about like it might ask you for a headline. Give some keywords in the topic and it will generate unique content for you in a few seconds.Best Free Ai Content Generator ToolsThere are many AI generator tools. But today I will talk about 5 content generators that are better than other content generators and easy to use. And these content generators will give you much better content than any other content generator.Simplified- Content Generator ToolSimplified is one of the best content generator tools. There are a lot of free tools you'll find here. You can generate up to five thousand words by Simplified which is huge. And also there are a lot of free features available in Simplified.1. Ryter: An All In One Content WriterRyter is a next-level content generator tool Because it can understand the language model deeply. For this reason, it can generate the best content. You can use all the features for free but you can only generate 5000 words per month.2. Copy Ai Free Ai Content GeneratorCopy AI is the best content generator of any other tool. Because it is built on the world's best ai technology. So it can generate more creative and best content very fast. You can generate 100 pieces of content in the first months by Copy Ai Free Content Generator.3. Content Bot Advance AI WriterContent Bot Advance AI Writer tool can generate content from any short hints or keywords. And it's a very powerful content generator tool. You can generate 500 pieces of content per month and one thousand five hundred long-form editor words every month. But it's a little bit hard to use.4. Smart Copy By UnbounceSmart Copy is one of the advanced level AI writing tools. You can use it to generate your content You can use all features fully free but you can generate only 5 articles per day.So here is the top five best AI content generator tool you can use a lot of free features without purchasing it but there is a few limitations. So try to use free features.
Read More Feb 6, 2023
How to Use Ansible to Install and Set Up Docker on Ubuntu 22.04
IntroductionServer automation now plays an essential role in systems administration, due to the disposable nature of modern application environments. Configuration management tools such as Ansible are typically used to streamline the process of automating server setup by establishing standard procedures for new servers while also reducing human error associated with manual setups.Ansible offers a simple architecture that doesn’t require special software to be installed on nodes. It also provides a robust set of features and built-in modules which facilitate writing automation scripts.This guide explains how to use Ansible to automate the steps contained in our guide on How To Install and Use Docker on Ubuntu 22.04. Docker is an application that simplifies the process of managing containers, resource-isolated processes that behave in a similar way to virtual machines, but are more portable, more resource-friendly, and depend more heavily on the host operating system.PrerequisitesIn order to execute the automated setup provided by the playbook in this guide, you’ll need:One Ansible control node: an Ubuntu 22.04 machine with Ansible installed and configured to connect to your Ansible hosts using SSH keys. Make sure the control node has a regular user with sudo permissions and a firewall enabled, as explained in our Initial Server Setup guide. To set up Ansible, please follow our guide on How to Install and Configure Ansible on Ubuntu 22.04.One or more Ansible Hosts: one or more remote Ubuntu 22.04 servers previously set up following the guide on How to Use Ansible to Automate Initial Server Setup on Ubuntu 22.04.Before proceeding, you first need to make sure your Ansible control node is able to connect and execute commands on your Ansible host(s). For a connection test, check Step 3 of How to Install and Configure Ansible on Ubuntu 22.04.What Does this Playbook Do?This Ansible playbook provides an alternative to manually running through the procedure outlined in our guide on How To Install and Use Docker on Ubuntu 22.04. Set up your playbook once, and use it for every installation after.Running this playbook will perform the following actions on your Ansible hosts:Install aptitude, which is preferred by Ansible as an alternative to the apt package manager.Install the required system packages.Install the Docker GPG APT key.Add the official Docker repository to the apt sources.Install Docker.Install the Python Docker module via pip.Pull the default image specified by default_container_image from Docker Hub.Create the number of containers defined by the container_count variable, each using the image defined by default_container_image, and execute the command defined in default_container_command in each new container.Once the playbook has finished running, you will have a number of containers created based on the options you defined within your configuration variables.To begin, log into a sudo enabled user on your Ansible control node server.Step 1 — Preparing your PlaybookThe playbook.yml file is where all your tasks are defined. A task is the smallest unit of action you can automate using an Ansible playbook. But first, create your playbook file using your preferred text editor:nano playbook.yml CopyThis will open an empty YAML file. Before diving into adding tasks to your playbook, start by adding the following:playbook.yml--- - hosts: all become: true vars: container_count: 4 default_container_name: docker default_container_image: ubuntu default_container_command: sleep 1 CopyAlmost every playbook you come across will begin with declarations similar to this. hosts declares which servers the Ansible control node will target with this playbook. become states whether all commands will be done with escalated root privileges.vars allows you to store data in variables. If you decide to change these in the future, you will only have to edit these single lines in your file. Here’s a brief explanation of each variable:container_count: The number of containers to create.default_container_name: Default container name.default_container_image: Default Docker image to be used when creating containers.default_container_command: Default command to run on new containers.Note: If you want to see the playbook file in its final finished state, jump to Step 5. YAML files can be particular with their indentation structure, so you may want to double-check your playbook once you’ve added all your tasks.Step 2 — Adding Packages Installation Tasks to your PlaybookBy default, tasks are executed synchronously by Ansible in order from top to bottom in your playbook. This means task ordering is important, and you can safely assume one task will finish executing before the next task begins.All tasks in this playbook can stand alone and be re-used in your other playbooks.Add your first tasks of installing aptitude, a tool for interfacing with the Linux package manager, and installing the required system packages. Ansible will ensure these packages are always installed on your server:playbook.yml tasks: - name: Install aptitude apt: name: aptitude state: latest update_cache: true - name: Install required system packages apt: pkg: - apt-transport-https - ca-certificates - curl - software-properties-common - python3-pip - virtualenv - python3-setuptools state: latest update_cache: true CopyHere, you’re using the apt Ansible built-in module to direct Ansible to install your packages. Modules in Ansible are shortcuts to execute operations that you would otherwise have to run as raw bash commands. Ansible safely falls back onto apt for installing packages if aptitude is not available, but Ansible has historically preferred aptitude.You can add or remove packages to your liking. This will ensure all packages are not only present, but on the latest version, and do after an update with apt is called.Step 3 — Adding Docker Installation Tasks to your PlaybookYour task will install the latest version of Docker from the official repository. The Docker GPG key is added to verify the download, the official repository is added as a new package source, and Docker will be installed. Additionally, the Docker module for Python will be installed as well:playbook.yml - name: Add Docker GPG apt Key apt_key: url: https://download.docker.com/linux/ubuntu/gpg state: present - name: Add Docker Repository apt_repository: repo: deb https://download.docker.com/linux/ubuntu jammy stable state: present - name: Update apt and install docker-ce apt: name: docker-ce state: latest update_cache: true - name: Install Docker Module for Python pip: name: docker CopyYou’ll see that apt_key and apt_repository built-in Ansible modules are first pointed at the correct URLs, then tasked to ensure they are present. This allows installation of the latest version of Docker, along with using pip to install of the module for Python.Step 4 — Adding Docker Image and Container Tasks to your PlaybookThe actual creation of your Docker containers starts here with the pulling of your desired Docker image. By default, these images come from the official Docker Hub. Using this image, containers will be created according to the specifications laid out by the variables declared at the top of your playbook:playbook.yml - name: Pull default Docker image community.docker.docker_image: name: "{{ default_container_image }}" source: pull - name: Create default containers community.docker.docker_container: name: "{{ default_container_name }}{{ item }}" image: "{{ default_container_image }}" command: "{{ default_container_command }}" state: present with_sequence: count={{ container_count }} Copydocker_image is used to pull the Docker image you want to use as the base for your containers. docker_container allows you to specify the specifics of the containers you create, along with the command you want to pass them.with_sequence is the Ansible way of creating a loop, and in this case, it will loop the creation of your containers according to the count you specified. This is a basic count loop, so the item variable here provides a number representing the current loop iteration. This number is used here to name your containers.Step 5 — Reviewing your Complete PlaybookYour playbook should look roughly like the following, with minor differences depending on your customizations:playbook.yml--- - hosts: all become: true vars: container_count: 4 default_container_name: docker default_container_image: ubuntu default_container_command: sleep 1d tasks: - name: Install aptitude apt: name: aptitude state: latest update_cache: true - name: Install required system packages apt: pkg: - apt-transport-https - ca-certificates - curl - software-properties-common - python3-pip - virtualenv - python3-setuptools state: latest update_cache: true - name: Add Docker GPG apt Key apt_key: url: https://download.docker.com/linux/ubuntu/gpg state: present - name: Add Docker Repository apt_repository: repo: deb https://download.docker.com/linux/ubuntu jammy stable state: present - name: Update apt and install docker-ce apt: name: docker-ce state: latest update_cache: true - name: Install Docker Module for Python pip: name: docker - name: Pull default Docker image community.docker.docker_image: name: "{{ default_container_image }}" source: pull - name: Create default containers community.docker.docker_container: name: "{{ default_container_name }}{{ item }}" image: "{{ default_container_image }}" command: "{{ default_container_command }}" state: present with_sequence: count={{ container_count }} CopyFeel free to modify this playbook to best suit your individual needs within your own workflow. For example, you could use the docker_image module to push images to Docker Hub or the docker_container module to set up container networks.Note: This is a gentle reminder to be mindful of your indentations. If you run into an error, this is very likely the culprit. YAML suggests using 2 spaces as an indent, as was done in this example.Once you’re satisfied with your playbook, you can exit your text editor and save.Step 6 — Running your PlaybookYou’re now ready to run this playbook on one or more servers. Most playbooks are configured to be executed on every server in your inventory by default, but you’ll specify your server this time.To execute the playbook only on server1, connecting as sammy, you can use the following command:ansible-playbook playbook.yml -l server1 -u sammy CopyThe -l flag specifies your server and the -u flag specifies which user to log into on the remote server. You will get output similar to this:Output. . . changed: [server1] TASK [Create default containers] ***************************************************************************************************************** changed: [server1] => (item=1) changed: [server1] => (item=2) changed: [server1] => (item=3) changed: [server1] => (item=4) PLAY RECAP *************************************************************************************************************************************** server1 : ok=9 changed=8 unreachable=0 failed=0 skipped=0 rescued=0 ignored=0 Note: For more information on how to run Ansible playbooks, check our Ansible Cheat Sheet Guide.This indicates your server setup is complete! Your output doesn’t have to be exactly the same, but it is important that you have zero failures.When the playbook is finished running, log in via SSH to the server provisioned by Ansible to check if the containers were successfully created.Log in to the remote server with:ssh sammy@your_remote_server_ip CopyAnd list your Docker containers on the remote server:sudo docker ps -a CopyYou should see output similar to this:OutputCONTAINER ID IMAGE COMMAND CREATED STATUS PORTS NAMES a3fe9bfb89cf ubuntu "sleep 1d" 5 minutes ago Created docker4 8799c16cde1e ubuntu "sleep 1d" 5 minutes ago Created docker3 ad0c2123b183 ubuntu "sleep 1d" 5 minutes ago Created docker2 b9350916ffd8 ubuntu "sleep 1d" 5 minutes ago Created docker1 This means the containers defined in the playbook were created successfully. Since this was the last task in the playbook, it also confirms that the playbook was fully executed on this server.ConclusionAutomating your infrastructure setup can not only save you time, but it also helps to ensure that your servers will follow a standard configuration that can be customized to your needs. With the distributed nature of modern applications and the need for consistency between different staging environments, automation like this has become a central component in many teams’ development processes.In this guide, you demonstrated how to use Ansible to automate the process of installing and setting up Docker on a remote server. Because each individual typically has different needs when working with containers, we encourage you to check out the official Ansible documentation for more information and use cases of the docker_container Ansible module.If you’d like to include other tasks in this playbook to further customize your initial server setup, please refer to our introductory Ansible guide Configuration Management 101: Writing Ansible Playbooks.
Read More